If you’ve ever tried to reach a faucet mounting nut buried behind a sink basin, you already know that standard wrenches won’t cut it. That’s exactly the problem a basin wrench solves. Knowing how to use a basin wrench properly is one of those fundamental skills that separates a confident plumber from someone still fumbling in tight spaces. Whether you’re an apprentice on your first service call or a journeyman brushing up on basics, this tool deserves a permanent spot in your bag.
At plumbingjobs, we build resources for plumbing professionals who take their craft seriously. Faucet replacements and under-sink repairs are bread-and-butter tasks in residential service work, the kind of work that shows up in job descriptions daily on our board. Getting comfortable with a basin wrench means faster installs, fewer scraped knuckles, and more efficient work on the job site.
This guide walks you through the exact steps to position, grip, and turn a basin wrench to loosen or tighten nuts in cramped spaces under a sink. You’ll learn how the jaw mechanism works, which direction to set it for loosening versus tightening, and how to avoid the most common mistakes. By the end, you’ll handle this tool like you’ve been using it for years.
What a basin wrench is and when to use it
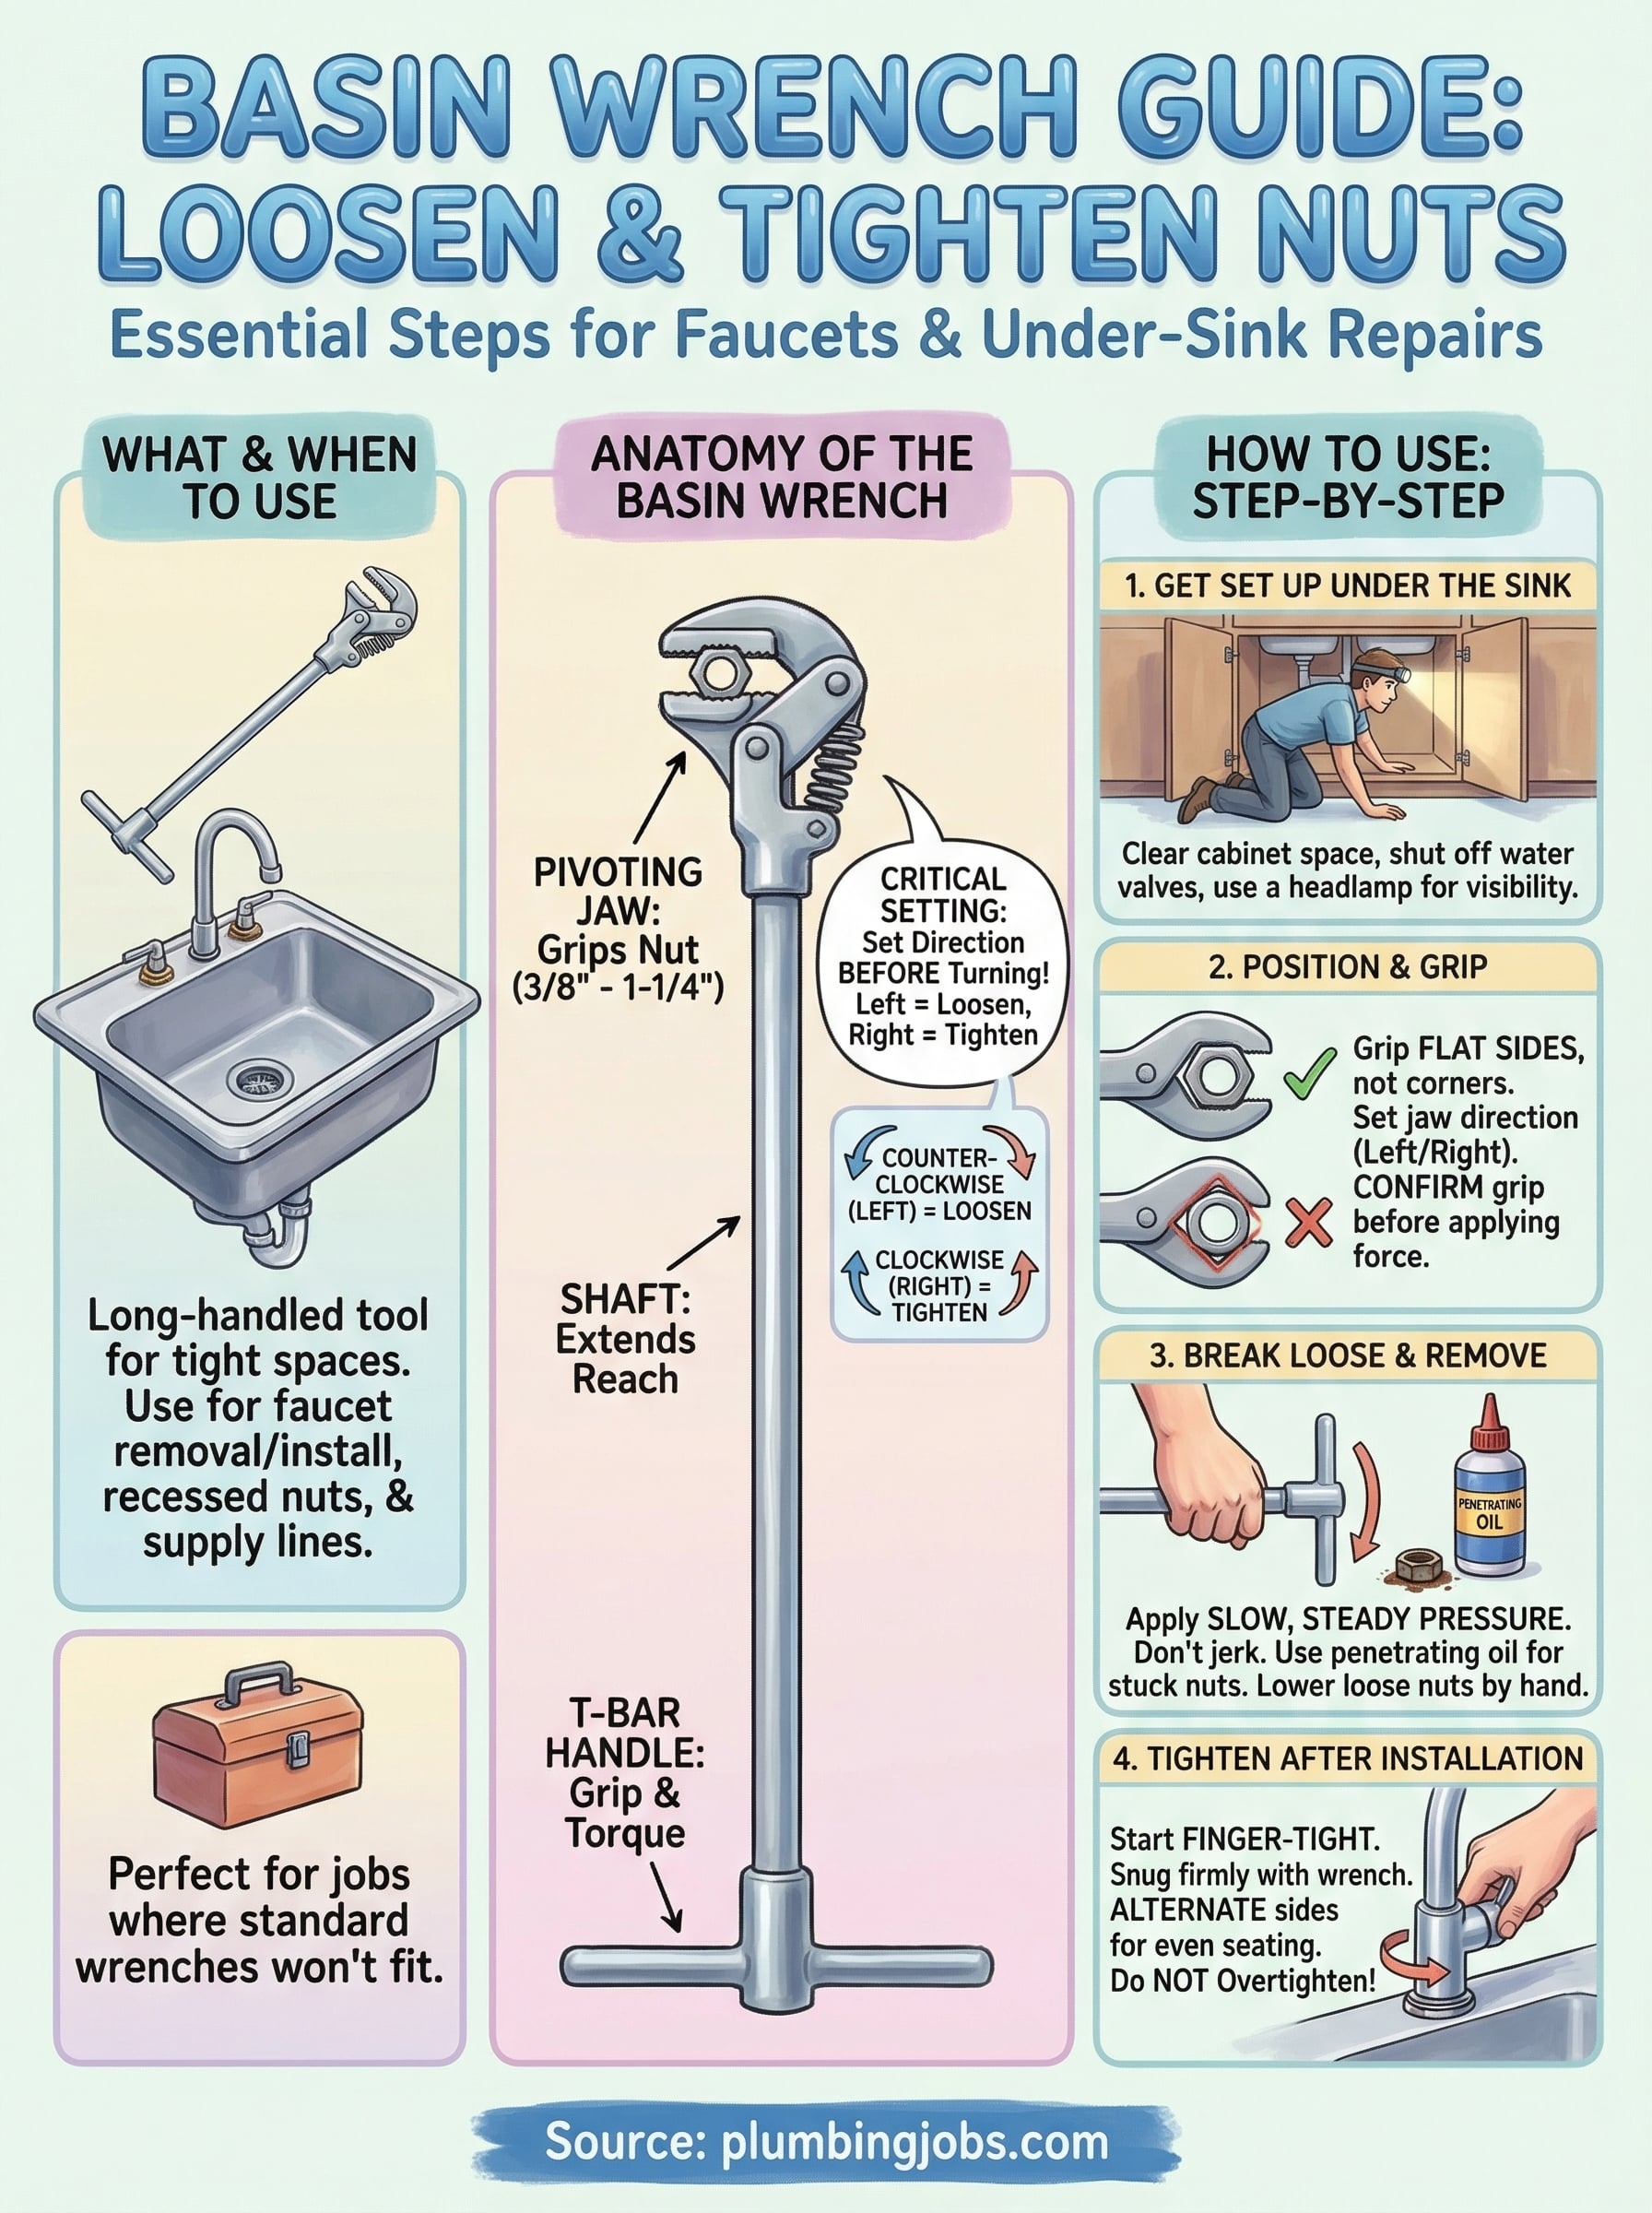
A basin wrench is a long-handled plumbing tool with a pivoting jaw at one end, built specifically to reach up into tight spaces and turn nuts that no other wrench can get to. The handle typically runs 12 to 17 inches long, giving you the reach you need behind deep sink basins. The jaw swings 180 degrees, so you can switch it from loosening to tightening without repositioning your entire body.
The anatomy of the tool
The tool has three main parts: the T-bar handle at the bottom for grip and torque, the shaft that extends your reach up behind the basin, and the pivoting jaw head at the top. The jaw has a spring-loaded design that grips a nut when you apply rotational force. Most jaws fit nuts ranging from 3/8 inch to 1-1/4 inches. Knowing how to use a basin wrench correctly starts with understanding how that jaw engages, because if you set the pivot direction wrong, the tool will spin freely instead of biting.
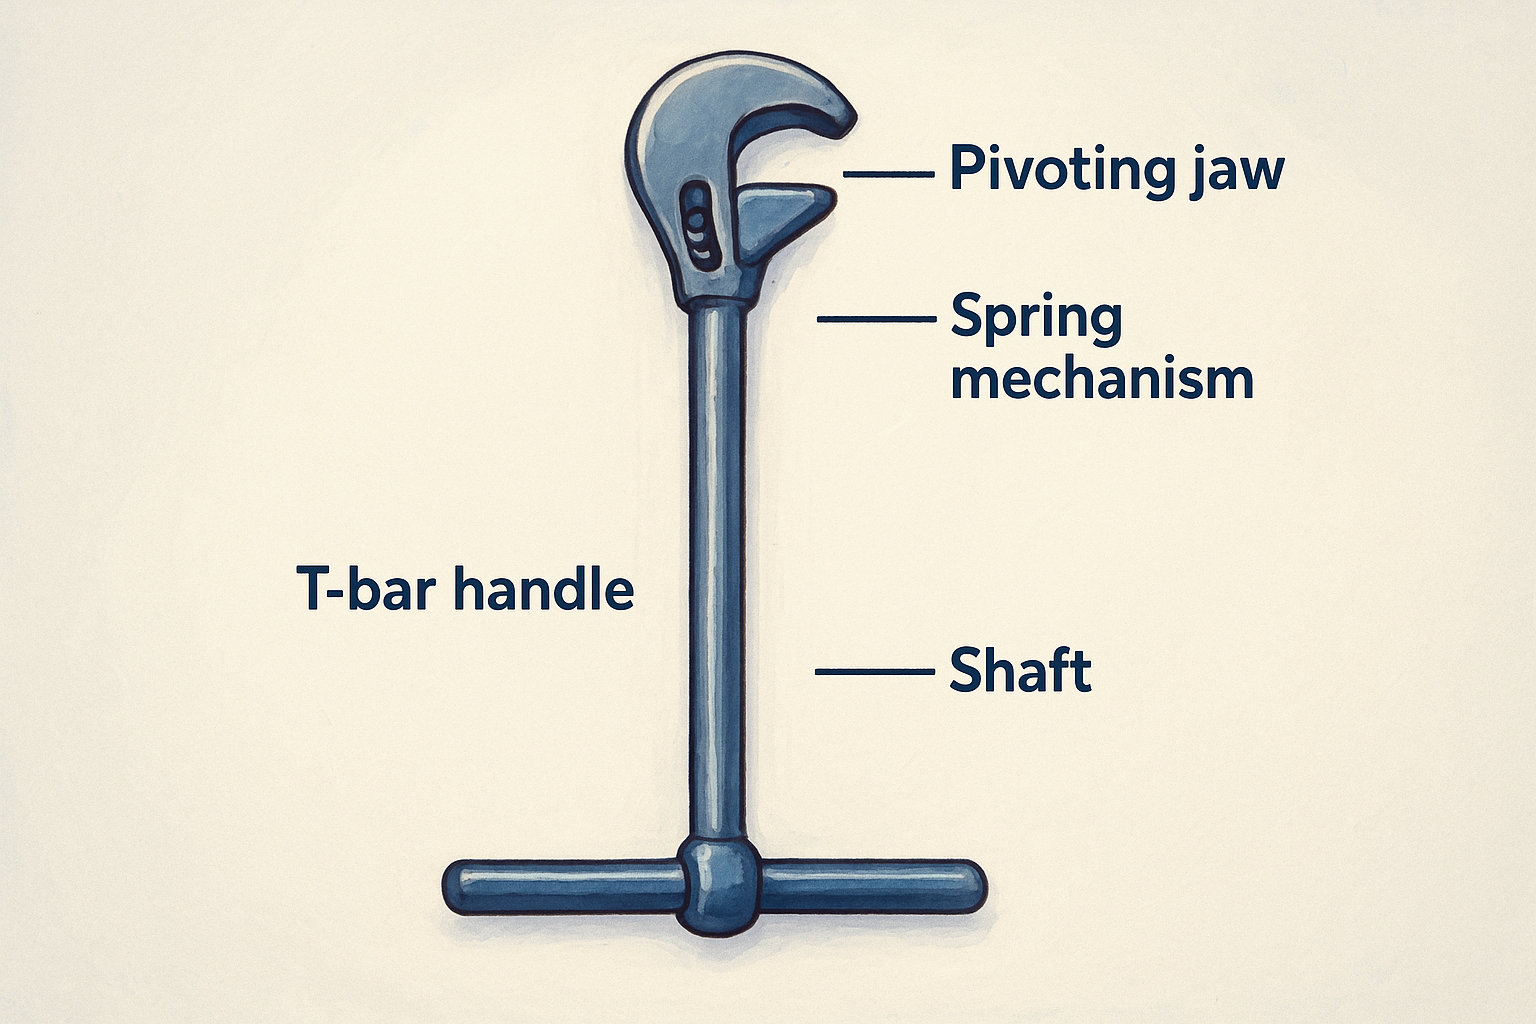
The jaw direction is the single most important setting on a basin wrench. Set it for the wrong rotation and you will turn all day without moving the nut.
| Part | Function |
|---|---|
| T-bar handle | Provides grip and lets you apply torque |
| Shaft | Extends reach up behind the sink basin |
| Pivoting jaw | Grips the nut and transfers rotational force |
| Spring mechanism | Keeps the jaw seated during rotation |
When to reach for a basin wrench
You need this tool any time you’re removing or installing a faucet and the mounting nuts sit more than a few inches above the cabinet floor. Standard jobs include single-handle kitchen faucets, two-handle bathroom faucets, and any fitting where the nut is recessed tightly against the underside of the deck. If you can reach the nut with a standard adjustable wrench or channel-lock pliers, skip it. The moment your hand won’t fit, pull this tool out instead.
Reach for it on supply line locknuts, faucet mounting nuts, and any nut positioned directly above a deep sink basin. Those are the jobs it was built for.
Step 1. Get set up under the sink
Before you pick up the tool, spend two minutes preparing the workspace. A cluttered cabinet forces awkward angles, and awkward angles turn a five-minute job into a frustrating twenty-minute struggle. Clear out everything stored under the sink and shut off the water supply valves before you touch anything else.
Clear the cabinet and gather your supplies
Pull everything out from under the cabinet completely. You need open floor space to slide in and move your arms without restriction. Once the cabinet is empty, gather what you need before you go under: your basin wrench, a headlamp or clip light, a bucket, and a towel to catch residual drips from the supply lines. Knowing how to use a basin wrench efficiently starts with having everything within arm’s reach so you are not crawling in and out repeatedly mid-job.
Turn off both water supply valves fully and open the faucet handle to release pressure in the lines before you loosen any nuts.
Get your body positioned correctly
Lay a folded towel or thin kneeling pad on the cabinet floor and slide in feet-first so your back rests against the cabinet opening. This position keeps your arms free and your head angled up toward the sink basin without straining your neck. Point your headlamp directly at the mounting nuts before you raise the wrench, so you can see exactly where the jaw needs to land and confirm the jaw direction before you apply any force.
Step 2. Position the jaws so they bite, not slip
With your headlamp on and your eyes on the nut, raise the wrench so the jaw wraps around the flat sides of the mounting nut, not the corners. Gripping the corners is the most common reason the jaw slips under load, and on a corroded nut it can round off the edges fast, turning a simple job into a difficult extraction.
Set the jaw direction before you apply force
The pivoting jaw locks in one of two positions depending on which way you rotate it by hand. Swing the jaw toward the left to set it for loosening (counterclockwise), and swing it toward the right to set it for tightening (clockwise). You can feel the jaw click into position when it seats correctly. Flip the jaw direction by hand before raising the wrench into position so you are not adjusting it blind above the basin.
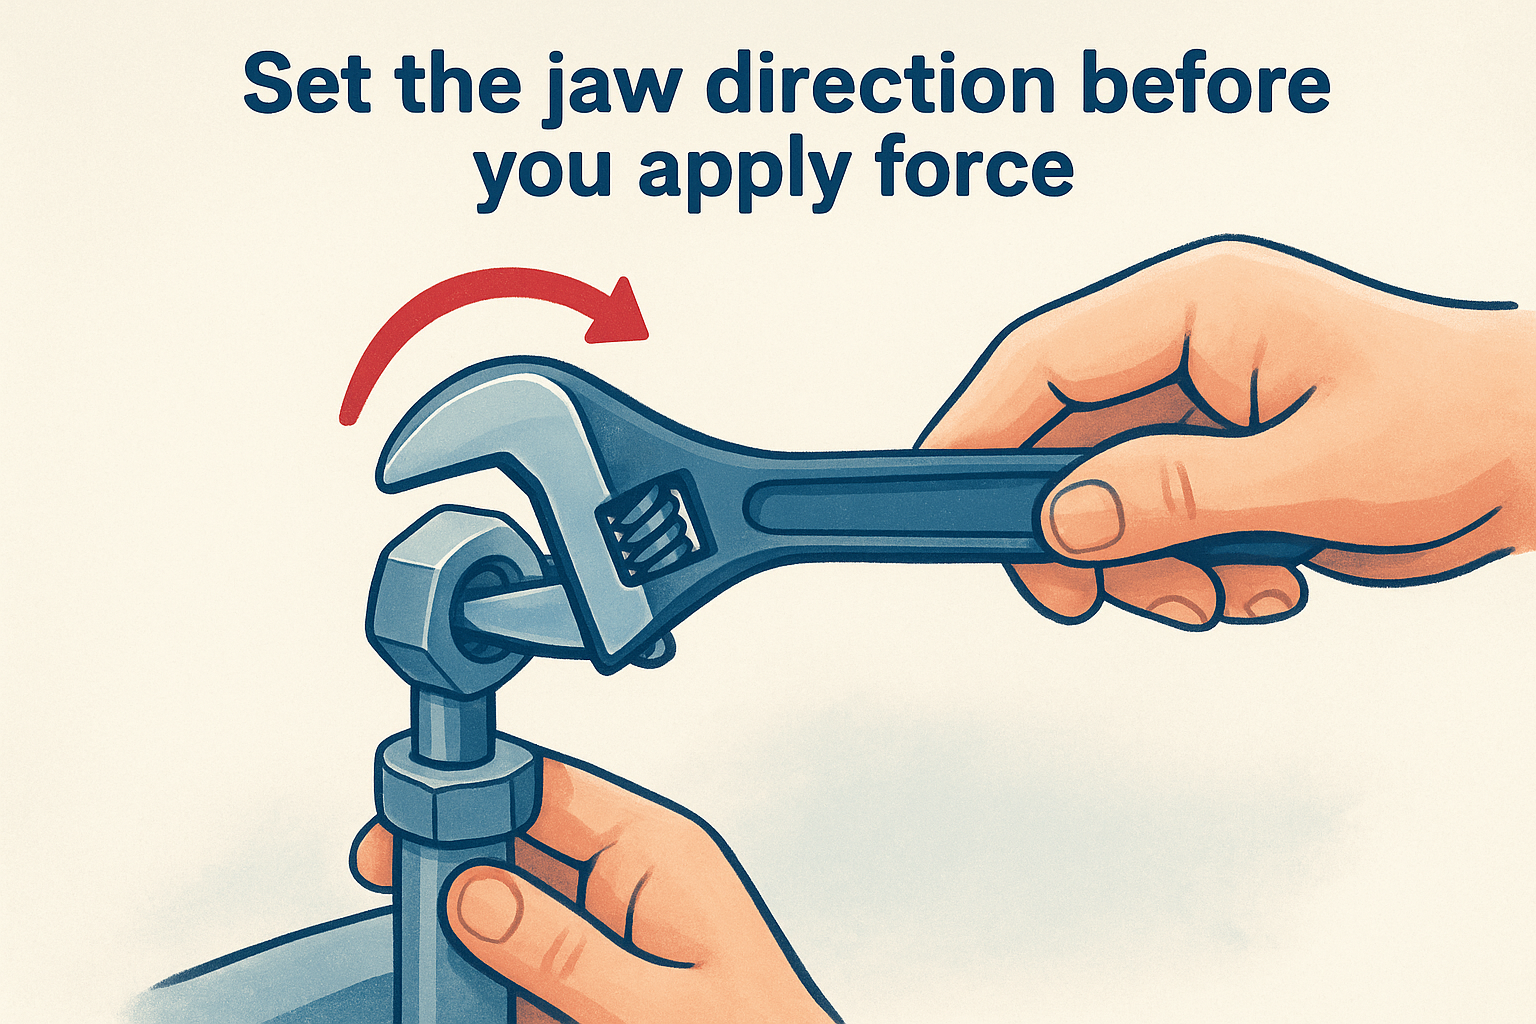
Always confirm the jaw direction before you apply torque. One hard turn in the wrong direction will kick the jaw off the nut and force you to start over.
Confirm the grip before turning
Once the jaw is set, pull the T-bar handle slowly in the loosening direction to feel the jaw load up against the nut. If the jaw bites and holds, you are seated correctly. If it spins or skips, drop the wrench and reposition the jaw squarely against the flat faces. Knowing how to use a basin wrench effectively comes down to this confirmation step: a solid bite on the flats delivers clean, controlled torque on every turn.
Step 3. Break loose stuck nuts and remove the faucet
Corroded or over-tightened nuts require more than a single hard pull. Apply slow, steady pressure on the T-bar handle rather than jerking it sharply. A sharp jerk kicks the jaw off the nut and can round the corners, turning a simple job into a difficult extraction. The goal is controlled torque that builds gradually until the nut breaks free.
Handle stuck nuts without damaging them
When a nut won’t budge, penetrating oil is your best first move. Spray it around the base of the nut, wait five to ten minutes, then apply pressure again with the basin wrench. For heavily corroded nuts, repeat the oil application a second time before you commit to full force.
If the nut still won’t move after two oil applications, work it back and forth in short strokes to crack the corrosion bond before pushing for a full counterclockwise turn.
| Situation | Action |
|---|---|
| Nut is stiff but turning | Steady pressure, short controlled strokes |
| Nut is completely frozen | Apply penetrating oil, wait 10 minutes |
| Jaw keeps slipping | Recheck grip on flat faces, not corners |
Remove the faucet cleanly once the nuts are off
Once both mounting nuts are fully loose, lower them by hand and set them aside where they won’t roll. Pull the faucet straight up through the deck opening. Knowing how to use a basin wrench correctly through this step means the deck surface stays undamaged and the supply lines disconnect without stress.
Check the supply line connections before you put your tools away. Hand-tighten the supply line nuts back onto the shutoff valves if you disconnected them, so the fittings are ready for the new installation. Keep the old mounting nuts in a small bag in case you need to match the thread size.
Step 4. Tighten nuts correctly after installation
Tightening mounting nuts after dropping in a new faucet uses the same basin wrench you used to remove the old one, but you flip the jaw direction. Swing the jaw toward the right to set it for clockwise rotation, then raise the wrench and confirm the jaw bites the flat faces before you apply any force.
Set the jaw and build torque evenly
Start each nut finger-tight by hand before you bring the basin wrench in. This prevents cross-threading, which can crack plastic nut bodies and strip threads on the faucet shank. Once the nut is hand-seated, use the wrench to add a quarter turn at a time, alternating between the two mounting nuts so the faucet deck plate seats evenly without cocking to one side. Knowing how to use a basin wrench for installation is just as important as removal: uneven tightening will leave the faucet loose and allow water to work past the base plate gasket over time.
Snug the nuts firmly, but stop before you reach maximum force. Plastic nuts crack under excess torque, and even brass nuts can strip the faucet threads if you overtighten.
Confirm the faucet is secure before turning the water back on
Once both nuts are tight, grip the faucet handle and try to rock it side to side. It should feel completely rigid with zero play. If it shifts at all, go back under and snug the loose nut further before restoring water pressure.
Wrap-up and next steps
You now have a complete picture of how to use a basin wrench from setup through final tightening. The key moves are clearing your workspace before you go under, setting the jaw direction before you apply force, gripping the flat faces of the nut, and building torque steadily instead of jerking the handle. Follow those four steps and most faucet jobs go smooth and fast without rounded nuts or damaged threads.
Faucet replacements and under-sink repairs are some of the most common tasks listed on residential service calls, so this skill will come up on the job regularly. The more installs you complete, the faster your hands learn exactly where to position that jaw without thinking twice. If you’re looking to put these skills to work, browse the latest plumbing job listings on our blog for industry updates and career resources to keep moving forward in the trade.
64 thoughts on “Under-Sink Guide: How To Use A Basin Wrench To Loosen Nuts”
Comments are closed.